Thursday, 7 August 2008

Paper Chef - July


This month for the Paper Chef we had to use the following ingredients:
Fresh oregano, Walnuts, Chickpea or Chickpea flour and
Fish steaks.


Now what to do with these ingredients?
After a trip to our local market for fish I settled on creating a salad of some type. A bit of discussion with Paul as to how to combine the ingredients we settled on the following combination:

Chickpea salad with Rainbow Trout Steaks and Walnut & Oregano sauce

For the Salad:
1 onion, finely chopped
1 garlic clove, finely chopped
1 tin chickpea
1 tbsp sambal oelek (chili paste)
1 tbsp fresh oregano
1 large handful wild rocket

Gently sauté the onion and garlic in olive oil along with the chilli till soft.
Drain and rinse the chickpeas and add to the pan along with the finely shredded oregano.
Gently stir the chickpeas till they are heated through & coated with the onion mixture. Season with salt. Remove from the heat & toss with the rocket.

For the Fish:
2 rainbow trout fillets, cut into steaks
Chickpea flour

Dust the trout steaks with flour. It prevents the fish from sticking to the pan .
Pan fry over medium heat skin side down for about 1 minute then turn over and fry for a further 1 minute, or until cooked to your liking.
Drain on paper towel to remove the excess oil.

For the Pesto:
100g walnuts, roasted till golden
Lots of fresh parsley and oregano
50ml olive oil
Salt & pepper to season
Lemon zest & juice (to taste)

Throw it all into a food processor & blend. Add lemon zest & juice to taste & season as needed.
If the pesto is a bit thick add some water to dilute.

And to assemble:
Place the warm salad on a plate & arrange the trout steaks around salad and serve with pesto on the side.

Sunday, 29 June 2008

Daring Bakers - Dainish Braid

Yes its that time of month again, The Daring Bakers Challenge.
Thos month was something a bit different. Something that I had never contemplated creating, but have eaten on numerous occasions. Danish Braid.
I actually found this recipe fairly easy. There were no unusual ingredients to source and the method was nothing unusual. My only problem was timing. I didn’t read the recipe all the way through when planning my timings. I started my creation mid-late afternoon. That would have left plenty of time to prepare, rollout the pastry four times, chilling it for 30minutes between each turn, preparing the filling, and assembling it for baking. I didn’t read that I had to let the pastry chill for 5 hours after the final turn, and didn’t read that I had to let it prove for 2 hours after assembling it. Lets just say it ended up being a late night…
The recipe stated that there was enough pastry for 2 braids, So I made 2 braids over 2 nights, one with the apple filling & the other with cream cheese & black cherries.
The pictures you see here are of the 2nd braid. The first was not a braid but a rope. I’d cut the slits down the wrong (long) side of the pastry. Still, the apple filling was nice! This braid i glazed with a cherry syrup, for a dash of colour.
Now onto next months challenge. Hopefully a recipe without buttercream!

Tuesday, 10 June 2008

Paper Chef - June


Here I am doing a last minute write up for my entry for The Paper Chef. This was meant to be created & posted yesterday, but a slight hitch with Paul’s Kangaroo tail lasagna meant everything was set back a day…. (The lasagna was divine by the way).

The gorgeous Ilva from
Lucullian Delights and more recently The Paper Chef is promoting this event. And what is the Paper Chef? It’s a challenge using four selected ingredients & creating something out of it in a limited time. Think of the love child of the TV shows “Ready Steady Cook” and “The Iron Chef” and you get the general idea.
This month we had the following ingredients:


Lamb
Buckwheat
Leek
English Peas (?)

Like Ilva, I’m still trying to work out what English peas are! So I stuck with the frozen variety... Otherwise sourcing the ingredients wasn’t a problem.

Now what to do with these ingredients?
I decided to do a cross-cultural collision:
Buckwheat galettes (recipe courtesy of Rick Stein) made into parcels filled with ground lamb & peas and served with a leek soubise.
The parcel idea came from childhood memories of my grandma’s meat filled crepes.

Buckwheat Galettes
75g buckwheat flour
25g plain flour
large pinch of salt
120ml Milk
120ml water
2 medium eggs, beaten
25g melted butter, plus extra for cooking

Sift the buckwheat flour, plain flour & salt into a mixing bowl and make a well in the center.
Mix the water & milk and whisk enough into the flour to make a smooth batter.
Lightly whisk in the eggs and warm melted butter. Do not over beat the mixture or it will become elastic resulting in tough galettes.
Leave to stand for at least 30 minutes.
Just before you are ready to cook stir in a little more of the water/milk, until the mixture has the consistency of double cream.
Brush the base of a crepe pan with a little melted butter and pour in a thin layer and swirl the pan so the mixture lightly coats the base.
Cook over a high heat until lightly browned.
Flip the half cooked galette out onto a plate and continue cooking the remaining batter. Do not cook both sides!

Filling
400g Lamb mince
Oregano
Peas
Salt & pepper to taste

Brown the mince in olive oil & add oregano.
Season with salt & pepper.
Add the peas & set aside to cool.

Leek Soubise
1 leek juliennned
béchamel sauce (left over from the lasagna)
cream
butter

Sweat the leek in butter. When tender add the béchamel. Enrichen withcream. Use a stick blender to whiz some of the leek into the sauce.

Assembly:
Place 1-2 spoonfuls of the lamb onto the fried side of the crepe, the fold in the bottom, sides & finally top to create a parcel. Repeat with the remaining crepes.
Shallow fry the parcels in oil/butter over a medium heat, folded side first to seal the parcel, then flip when the parcel is a nice golden brown colour.

I served these with the Leek sauce drizzled on top, but in hindsight (an amazing thing) I should have combined the sauce with the lamb inside the parcels.

Its fun being creative & inventive & I love The Paper Chef and its challenges!

12June08 i just added the logo at the top, created by Toontz of Okara Mountain

Wednesday, 28 May 2008

Daring Bakers - Opera Cake

Yes… another month has passed and its time for the next installment of the Daring Bakers Challenge.
This month it is Opera cake.
We were given instructions: it had to be white. No chocolate or coffee or dark colours. Why? Because its spring and everything is fresh & light. Well maybe in the northern hemisphere. But half the world is actually in the southern hemisphere and its autumn here. But I have stuck to the theme and kept it light & white & seasonal.
An Opera cake is a cake that is made up (usually) of five components: a jaconde (a cake layer), a syrup (to moisten the jaconde), a buttercream (to fill some of the layers), a ganache (to top the final cake layer) and a glaze (to cover the final layer of cake or of ganache). We were given a bit of leeway with the type of nut used in the jaconde. I went with a macadamia nut. Freshly cracked macadamias, coarsely ground to give some texture to the cake. This turned out quite nicely with a nice light colour and delicious flavour. The jaconde was then bathed in a syrup to give it some moisture. I had decided that mandarin was going to be the main flavour for my Opera cake. So the zest of the mandarin was used in the ganache and the juice was used in the syrup. As neither Paul nor myself are fans of the dreaded “buttercream” (read cholesterol, waistline spread, blocked arteries) I chose to go with a lighter vanilla ricotta cream for the layers. The only problem I had in assembling the cake was the glaze. It kept wanting to drip down the sides of the cake. Letting it cool slightly helped resolve that problem but didn’t give a mirror like finish to the cake. Oh well, can’t have everything (but I do try).


End result was a cake which I was very pleased with. Light & white with flecks of orangey/gold. And also had Paul’s approval (no mean feat!).
So another Daring Bakers Challenge is completed & consumed. What will be next?????

Sunday, 27 April 2008

Daring Bakers - Cheese Cake pops

This month’s Daring Bakers challenge was something a bit different, Cheesecake Pops. The idea of taking a baked cheesecake, rolling it into balls & dipping into chocolate was different & somewhat appealing. Work commitments this month actually spared me enough time to do the Daring Bakers Challenge. I admit I did make some modifications to the recipe. Bad me. But 5x 8-oz packs of cream cheese is way too much for just 2 health conscious guys. So I made 1/5th of the recipe. The other modification was no vanilla extract - just the seeds from a very plump vanilla pod. The cheesecake mixture turned out very creamy and delicious, so delicious that it almost didn’t get baked, thanks to Paul constantly tasting the mixture! But baked it was & the result was perfectly golden topped & moist. It’s definitely a recipe that will be made again.
Rather than weighing each ball, I rolled them into walnut sized balls (as stated in the recipe) and realized that I had too many balls. The original recipe said it made 30-40 balls, 30-40 divided by 5 is 6-8. I had a dozen. Oops. So I tried to increase the size. Mistake. The cheesecake was becoming too soft to remold into larger balls, so it was the walnut sized balls rather than 2oz balls. These were then frozen & then dipped into melted 70% cocoa chocolate. To let the chocolate set evenly I wedged them between two thick cookbooks (thanks to Maggie & Stephanie).
The end result? Beautiful soft delicious cheesecake coated with thin crisp chocolate coating. In hindsight I’d use chocolate with a much lower cocoa content. Even the thin coating was overpowering the delicate cheesecake. The mistake with the size of the balls was for the better. Larger balls would have been harder to eat neatly. These were just the right size.

Friday, 7 March 2008

Favourite Photos


I was just tagged by Paz from The Cooking Adventures of Chef Paz for a meme called 10.
10 what?
10 of my own favourite food photo's.
It sounded easy till I started going through all the photo's that I had taken of Paul's cooking (& my own). Two days later & I've finally decided. Paul might not agree, but here they are:

I'd just come home from the markets with these very fresh tomatoes.

One of my favourite pastimes is making pasta, & eating it of course!

I really can't remember what this dish was, but it looks great.

Truffles. Do you know how hard it is to take a photo of a brown lump of fungus?

Paul had just zested some limes for a dish & left them sitting on the bench. Very much a spur of the moment photo.

Alfajores & hot chocolate...

Some artisic pics...

Tangellos

Strawberry Jam

And to finish it all off, some humour. This is what happens when you try to be too creative. I call this "sunbaking quail"

This is the part that I hate. selecting others to carry on the meme. So rather than pointing the finger at people I'll let you decide if you want to be tagged.

Sunday, 3 February 2008

Paper Chef

When Ilva announced that she was resurrecting The Paper Chef, both Paul & myself wanted to participate. So, rather than combining our talents and creating one entry, we decided to do one each.
You’ve seen Paul’s entry, and here is my attempt.
Given what the four Paper Chef ingredients were – bacon, potato, plum tomato, and swede, I decided to use primarily those four ingredients.
I steamed some of the swede & mashed it with some salt, pepper & cream.
I created some chips by slicing & frying the potato and some of the swede.
The plum tomato was roasted with some a touch of garlic, bay leaf & olive oil. These were then mashed & the skins removed.
And simply fried the bacon.
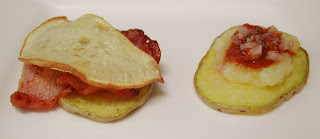
The end results were some petite little morsels.


To the right we have a potato chip, smeared with mashed swede, drizzled with roasted plum tomato and sprinkled with finely diced bacon.
To the left we have a tasty little sandwich of potato chip, bacon, roasted tomato & topped with a swede chip (Swedish chip??).
I enjoyed letting my imagination run riot & creating these promising little mouthfuls. Some fine-tuning and they will be superb.

Monday, 28 January 2008

Daring Bakers - Lemon Meringe Pie

Another Daring Bakers Challenge.
Another interesting recipe.
Another learning experience.

This challenge was a recipe which I have never made. Lemon Meringue Pie. I’ve made that type of pastry before. I’ve made meringues and pavlova’s before. & Paul has his own recipe for citrus curd. The challenge was to follow the recipe. While making the lemon curd, Paul was standing there asking me what on earth I was doing. “Following the recipe” was the obvious response. To which he replied. “That’s not any curd recipe I’ve ever seen” and left me to follow the recipe. Using exactly the ingredients, measures & procedures stipulated in the recipe, I was a bit perturbed to see the curd thicken, then go past the point that I would have considered “ideal”. Maybe the cornflour here in Australia is different to the USA. Who knows.
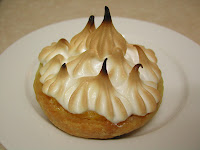
I also differed slightly in the construction of the pies. Instead of one large pie, or 6 free-form pies, I made eight individual pies, 3 each of 6.5cm, 8.5cm & 2 of 10cm diameter ramekins. After cutting out the pastry rounds, I upturned the ramekins & (covering them in foil) draped & pressed the pastry over the ramekins. Saves on blind baking & gave a nice home-style finish to the pastry. After the pastry is cooked, simply flip the whole ramekin & pastry onto a cooling rack.
The rest of the construction was as laid out in the recipe, with piped meringue to top it off. The end result was a series of good looking pies. We had the 3 smallest ones as individual desserts later that day, and friends acquired the other pies. Over all it was quite tasty, Paul suggested the lemon curd could be stronger in flavour & sweeter. I also thought that the curd was too firm in texture, making it chewier than I’d prefer. Still, it was fun making them. Next challenge please…

Tuesday, 8 January 2008

Apples & Thyme - Figgie Lollies

I have fond memories of Christmas as a child with my family. The family dinner with the various different courses prepared by my paternal grandmother. From a very young age I can remember her serving these sugar coated, rolled balls of figs. I’m sure that there was a proper name for these sweets, but we always referred to them as “Figgy Lollies”. A traditional sweet that made its way to the Australian table from the Caucasus Mountains of Russia, via Zagreb, with our grandmother. Our Christmas table is incomplete now without them.

Sadly, my grandmother passed away and for the last few years my sister, Tess, has been making them. Thankyou Tess for preserving the recipe and ensuring it remains with us for all time, and thank you to Jeni at The Passionate Palate & Inge at Vanielje Kitchen) for hosting Apples & Thyme.
This year I thought I’d make them for the family, but with a few very slight changes. My grandmother coated the balls in sugar but we decided to experiment & rolled some in cocoa, and coated others with dark chocolate. Some we left plain, and of course some were rolled in fine sugar.
These need to be prepared at least three weeks in advance to allow them to dry sufficiently. And they are excellent as simple, tasty, presents!

Components
500g dried figs (the drier the better)
1 thick skinned orange
125ml rum or brandy
400g dark brown sugar (approx)
Ground cinnamon, cloves or nutmeg

Process
Finely chop the figs by hand with a sharp knife or puree in food processor.
Add the orange juice, orange rind, sugar, liquor and spices. Combine ingredients and cook slowly for about an hour, stirring occasionally. My grandmother used a double saucepan over boiling water, but I simply used a saucepan.
The mixture should be a thick and sticky paste (do not be tempted to add water)- the colour will darken and the fig seeds obvious. The longer the mixture cooks the better, but be careful it doesn’t burn.
Spread the mixture onto a baking sheet, cover with a clean tea towel and put on a high shelf somewhere out of the way for a week or two. It is very important that the mixture be allowed to dry for 3 –4 weeks. It is ready when the mixture is dry to touch and somewhat set. Do not use an airtight container, for the obvious reason. Roll the fig mixture into balls (approx 2cm in diameter). Roll the balls in fine sugar (or cocoa and fine dark chocolate, as I did).
Place the Figgy Lollies in petit fours cases, and store somewhere dry until ready to eat.

Sunday, 23 December 2007

Daring Bakers - Yule Log

This was a totally new experience for me. My family never had Yule logs, & I have actually never tasted one either, so I guess I had nothing to compare this recipe to. Paul on the other hand, has made logs before, so his supervision was greatly appreciated. There were a few hiccups along the way, but I succeeded.
The first of these was the baking tray. I thought the one we had was the right size. That is until I had made the sponge mixture & was about to pour it into the tray. My esteemed partner advised me to measure the tray as he thought it was too small. He was right. It was 10x12 rather than the 10x15 (as stated in the recipe). I made the full amount anyway, then sliced it in half to make 2 slightly thinner sponges.
My second stumbling block was the buttercream. It curdled. Again Paul came to my rescue with the solution which saved the day (& a lot of buttercream). He advised whipping an amount of butter (I only had 50g left) then very slowly adding the curdled mixture a spoon at a time to the whipped butter and incorporating it thoroughly before adding the next spoonful. It worked.
Onto the sponge I spread a brandy syrup mixture, peach jam, vanilla buttercream and a dusting of cocoa powder. It was then rolled. The remaining buttercream was flavoured with coffee and applied to the log.
I decided to go with the meringue mushroom option & stuck the stems onto the caps with some buttercream and, as its summer here in Australia, I then added a few flowers for decoration.
It worked marvelously & even Paul was impressed.